Protein ice pops have quickly become a go-to treat in my house, especially during hot summers or after long workouts. As a busy dad trying to keep my kids’ snacks nutritious and fun, I stumbled across these chilled protein-packed popsicles as a better alternative to sugar-loaded treats. They’re not just a way to cool off—they’re a smart, satisfying way to sneak in more protein without heating up the kitchen.
In this article, I’ll walk you through everything you need to know about protein ice pops—from the best ingredients to use, how to make them at home, and whether they’re actually good for you. We’ll also dive into popular questions like “Are protein pops healthy?” and give you easy step-by-step guidance to whip them up from scratch.
Table of Contents
What Are Protein Ice Pops?Definition & Benefits
Quick Answer: What Are Protein Ice Pops?
Protein ice pops are frozen treats made by blending protein powder with yogurt, milk, or fruit and freezing them in molds. They offer a high-protein, low-sugar alternative to traditional popsicles—perfect for post-workout recovery, healthy snacking, or clean summer desserts.
What Makes a Protein Ice Pop Different?
Protein ice pops are exactly what they sound like—frozen popsicles made with added protein. Unlike traditional sugary ice pops, these are built with a goal: boost your daily protein intake in a cool, refreshing form. In my house, they’ve been a great post-gym snack for me and a guilt-free dessert for the kids.
What sets them apart is their balance. Instead of just offering a cold burst of fruit flavor, they combine taste with real fuel for your muscles. That makes them especially useful for folks on low-carb, high-protein, or post-workout recovery plans. Some brands even add collagen or plant-based proteins for specific dietary goals.
Common Ingredients in Protein Ice Pops
You don’t need fancy ingredients to make protein ice pops. The ones I whip up usually include:
- Protein powder – Whey, plant-based, or collagen (depending on dietary needs)
- Greek yogurt or coconut milk – For creaminess and added nutrients
- Fresh fruits – Strawberries, bananas, mango, or blueberries
- Natural sweeteners – Like honey, agave, or monk fruit
- Extras – Chia seeds, oats, or nut butter for texture and added health benefits
These ingredients freeze well and blend smoothly, making prep super easy. One quick blend, pour into molds, and freeze. Done.
Health Benefits of Protein Ice Pops
Nutritional Perks of Protein Ice Pops
Protein ice pops aren’t just a trendy snack—they offer real nutritional value when made right. Since switching to homemade versions, I’ve seen how they help my energy levels, especially during the afternoon slump. The combination of lean protein and natural ingredients makes them a smart option for anyone trying to eat cleaner.
Here are some of the biggest benefits:
- Protein support: Essential for muscle repair and satiety. Whether it’s whey or a plant-based source, the added protein helps curb hunger.
- Low in sugar: When made at home, you control the sweetness. No high-fructose corn syrup here.
- Portable fuel: Great for after workouts, school snacks, or late-night cravings.
- Hydrating: Made mostly with fruit and liquid bases, they help keep you hydrated during warm weather.
These pops can support low-carb diets, keto lifestyles, or simply serve as a healthy dessert replacement—especially when compared to store-bought frozen treats packed with additives.
Why They’re Great for Kids and Adults Alike
When my kids ask for seconds, I don’t worry. That’s the beauty of protein ice pops—they’re safe and satisfying for the whole family. Unlike regular ice cream or processed popsicles, you know exactly what’s going in.
For adults, they double as recovery food. I’ve even prepped a batch before long bike rides or hikes. Their cool texture makes them easier to consume after workouts than heavy shakes.
Plus, they’re an easy win for picky eaters. I blend in spinach or flaxseed with a banana base, and the kids never know the difference.
Best Protein Sources to Use in Ice Pops
Choosing the Right Protein Powder
The backbone of any protein ice pop is, of course, the protein source. Over the years, I’ve experimented with just about every kind you can imagine—some worked like a charm, others, not so much. Texture, flavor, and nutrition all play a role. If you’re looking for more natural, no-powder alternatives, check out these high-protein chia recipes that blend real ingredients without relying on supplements.
Here are the top protein powders I keep in rotation:
- Whey protein: My go-to for a smooth, creamy texture. It blends easily and freezes well. Great for muscle recovery.
- Plant-based proteins: Pea, hemp, and brown rice protein work great for vegan or dairy-sensitive diets. They tend to be a little grainier, so blending well is key.
- Collagen peptides: These are flavorless and dissolve effortlessly. I use them when I want extra skin and joint support.
- Casein protein: Thicker than whey, and perfect if you like a more ice cream–like consistency.
Each has its own taste and density, so I recommend trying a few to find your family’s favorite.
Natural Protein Add-Ins
While powders do the heavy lifting, I also love layering in natural, whole-food protein sources to boost nutrition. These simple ingredients make a big impact:
- Greek yogurt: Thick, protein-rich, and creamy. Perfect for fruity pops with a cheesecake vibe.
- Nut butters: Almond, peanut, or cashew butter adds richness, flavor, and healthy fats.
- Silken tofu: Neutral taste, smooth texture, and packed with plant-based protein.
- Chia seeds: Not just for fiber—they offer a small protein punch and make a fun texture in frozen treats.
- Rolled oats: Mild and hearty, they add fiber and a chewy bite.
In one of my favorite combos, I mix banana, Greek yogurt, vanilla whey protein, and a spoonful of almond butter. It’s basically a frozen smoothie on a stick.
Print
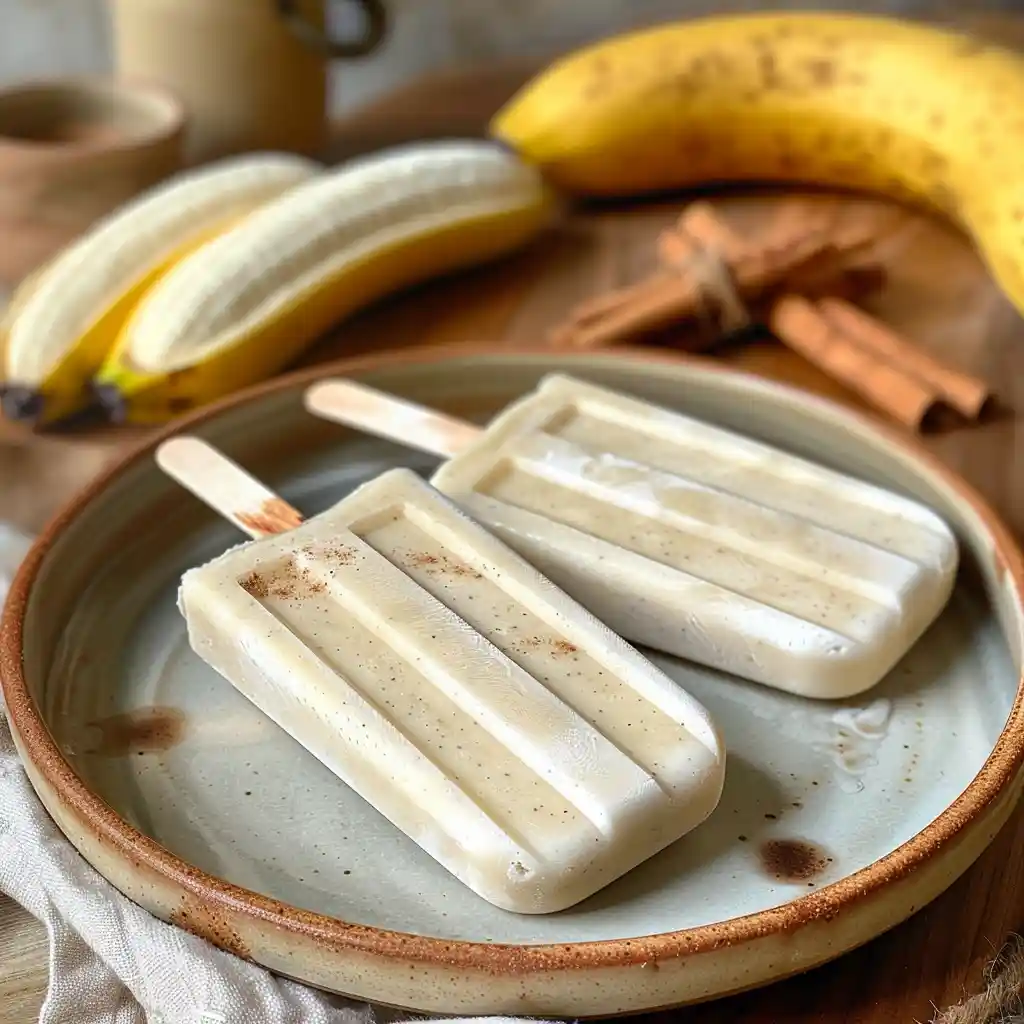
Protein Ice Pops
Protein ice pops are the perfect fusion of cool refreshment and nutritional boost—ideal for post-workout recovery, clean snacking, or a healthy dessert the whole family can enjoy.
- Total Time: 10 minutes (+ 4–6 hours freeze)
- Yield: 4–5 pops
Ingredients
- 1 ripe banana
- ½ cup Greek yogurt
- 1 scoop vanilla whey protein
- ¼ cup unsweetened almond milk
- 1 tsp honey or maple syrup (optional)
- ½ tsp cinnamon


Instructions
- Add all ingredients to your blender. Blend until completely smooth.
- Pour the mixture into ice pop molds, leaving a little space at the top for expansion.
- Insert sticks and freeze for 4–6 hours, or until fully set.
- To release, run warm water over the outside of the mold for 10 seconds and gently pull.

Notes
Customize your pops with different protein types, fruits, or texture boosters like chia seeds or oats. These pops can suit vegan, keto, or dairy-free lifestyles depending on your mix.
- Prep Time: 10 minutes
- Cook Time: 0 minutes
- Category: Snack
- Method: Freezing
- Cuisine: Healthy
How to Make Protein Ice Pops at Home
Tools You’ll Need to Get Started
You don’t need a fancy kitchen setup to make great protein ice pops—just a few basics. Over time, I’ve found these tools make the process quicker and cleanup easier:
- High-speed blender: Essential for smooth textures. Even frozen fruit and thick protein blends come out silky.
- Silicone or plastic molds: Reusable and easy to pop the frozen treats out. I prefer silicone for the flexibility.
- Wooden sticks: Classic and sturdy. Kids love the familiar popsicle feel.
- Measuring cups/spoons: Helps keep your macros consistent if you’re tracking nutrition.
That’s it. Just blend, pour, and freeze. If you’ve got little helpers in the kitchen, this becomes a fun hands-on activity too.
How to Make Protein Ice Pops (Easy 6-Step Recipe)
Here’s a simple recipe for banana vanilla protein ice pops you can customize to your liking:
Ingredients:
- 1 ripe banana
- ½ cup Greek yogurt
- 1 scoop vanilla whey protein
- ¼ cup unsweetened almond milk
- 1 tsp honey or maple syrup (optional)
- ½ tsp cinnamon
Instructions:
- Add banana, yogurt, protein powder, almond milk, sweetener, and cinnamon to a blender.
- Blend on high until smooth and creamy (30–45 seconds).
- Pour the mixture evenly into ice pop molds.
- Insert sticks into the center of each mold.
- Freeze for 4–6 hours, or until solid.
- To serve, run warm water over the mold and gently remove each pop.
This makes about 4–5 medium pops. For a tropical twist, try adding pineapple or mango instead of banana.
🔄 Swap fruit or protein flavors to customize. For a chocolate version, use cocoa powder and chocolate protein powder instead of banana and cinnamon.
Flavor Ideas and Customization Tips
Creative Protein Ice Pop Flavors to Try
Once you’ve mastered the basic recipe, it’s time to get creative. In my house, experimenting with new flavors is half the fun—and it helps keep everyone interested. Whether you’re craving fruity, creamy, or even dessert-inspired pops, there’s a combo for you.
Here are a few of our go-to flavor ideas:
- Berry Blast: Mixed berries + vanilla protein + almond milk + chia seeds
- Chocolate Banana: Cocoa powder + banana + Greek yogurt + chocolate whey protein
- Tropical Green: Pineapple + mango + spinach + coconut milk + plant protein
- Peanut Butter Cup: Peanut butter + chocolate protein + oat milk + dash of vanilla — similar to these monster cookie protein balls we also love making for dessert-style snacks.
- Strawberry Cheesecake: Strawberries + cream cheese + vanilla protein + yogurt
These combos can be adjusted to suit dietary needs—vegan, low-carb, or dairy-free. I often sneak in veggies like carrots or spinach with sweet fruits to balance taste and nutrition.
Customizing Texture, Sweetness, and Nutrition
Making protein ice pops is as flexible as cooking gets. Here are a few quick tricks I use to customize mine:
- Thicker consistency: Add Greek yogurt, frozen banana, or avocado
- Smoother texture: Use silken tofu or collagen peptides
- Extra sweetness: Blend in dates, a bit of maple syrup, or a splash of orange juice
- More fiber: Stir in oats, flaxseed, or chia
- Keto-friendly: Skip fruit, use almond butter, coconut milk, and stevia or monk fruit sweetener
My kids love it when I layer two flavors—like chocolate and strawberry—into one pop for a swirled effect. It’s a small touch that makes snack time feel special.nto one pop for a swirled effect. It’s a small touch that makes snack time feel special.
When to Eat Protein Ice Pops (Best Timing)
Post-Workout Recovery Snack
One of the best times to enjoy a protein ice pop is right after a workout. After a long jog or lifting session, I used to grab a heavy shake—sometimes even a protein-packed coffee like this one—until I realized these frozen pops delivered the same nutrients in a cooler, easier-to-digest form.
Protein helps your muscles recover, while the added fruits and liquids replenish energy and hydration. Plus, the cold treat feels amazing after a sweaty session.
Here’s a quick guide I follow post-workout:
- Within 30 minutes of finishing exercise
- Include at least 15g of protein per pop
- Pair with hydrating ingredients like coconut water or almond milk
My go-to post-run combo? Vanilla whey, banana, almond milk, and a pinch of sea salt.
Midday Energy Boost or Bedtime Treat
Protein ice pops also work great during those tricky snack windows. When I feel that midday crash coming, a protein pop does double duty: it satisfies my sweet tooth and gives me lasting energy without a sugar spike.
Even better, these treats are a calming bedtime snack. Casein protein or Greek yogurt digests slowly, which may help curb nighttime cravings and support overnight muscle recovery.
Here’s when my family enjoys them:
- Afternoon snack: Between lunch and dinner for kids and adults
- Evening treat: As a dessert swap, especially with chocolate or nut butter
- Breakfast: Yes, breakfast! Pair with oats and peanut butter in a frozen blend
Are Store-Bought Protein Pops Worth It?
Pros and Cons of Store-Bought Options
I’ll be honest—there are days when I don’t have time to make anything from scratch. That’s when I check out store-bought protein pops—or other convenient, protein-rich products like this high-protein pancake mix I reviewed. But not all brands are created equal, and over time, I’ve learned to read those labels carefully.
Pros:
- Convenient: Grab-and-go, especially helpful on busy days
- Long shelf life: No need to freeze them right away if they’re shelf-stable before opening
- Portion-controlled: Calorie and macro information is clearly labeled
- Variety: Tons of flavor options and protein types available
Cons:
- Added sugars: Many brands sneak in syrups, concentrates, or artificial sweeteners
- Lower protein: Some pops have less than 6g of protein—barely enough to make a dent
- Preservatives and fillers: Extra ingredients for shelf life or texture that aren’t needed at home
- Higher cost: You’re paying for convenience. Homemade versions are usually half the price
How to Choose a Good Brand
If you’re going to buy them, here’s what I always look for on the label:
- At least 10g of protein per serving
- Low sugar (under 6g) or naturally sweetened
- Real ingredients like fruit, yogurt, or nut milk
- Protein source: Whey isolate, plant-based blend, or collagen
- No artificial dyes or preservatives
Brands like Enlightened, Outshine with protein, or newer wellness-focused labels offer decent options, but homemade will always give you the cleanest version.
Protein Ice Pops for Special Diets (Keto, Vegan, Diabetic-Friendly)
Keto-Friendly Protein Pops
When I shifted to a low-carb lifestyle for a few months, I thought frozen treats were off the table. Turns out, with the right ingredients, keto protein ice pops are totally doable—and delicious.
To keep carbs low and flavor high, I use:
- Unsweetened almond or coconut milk
- Keto-friendly protein powder (like isolate or collagen)
- Nut butter for healthy fats
- Stevia, monk fruit, or erythritol for sweetness
- Flavor boosters: vanilla extract, cinnamon, cocoa powder
This same formula works well in other keto treats too—like this easy keto chia pudding, which uses many of the same low-carb, high-protein staples.
One of my favorites combines peanut butter, chocolate whey, coconut milk, and a pinch of salt. Creamy, indulgent, and still under 4g of net carbs per pop.
Vegan and Dairy-Free Variations
For plant-based eaters or those with dairy allergies, the trick is in the base and protein source. Here’s what works well:
- Non-dairy yogurt (coconut, almond, or oat)
- Pea or brown rice protein
- Avocado or silken tofu for creaminess
- Fruits like mango, banana, and berries
- Maple syrup or dates for natural sweetness
These combinations create a smooth, flavorful ice pop that even non-vegans enjoy. I often prep an extra batch for my friends who avoid dairy—you’d never guess they’re fully vegan.
Diabetic-Friendly Swaps
My father-in-law has Type 2 diabetes, so I’ve learned to make blood sugar–friendly pops that still taste like dessert.
Here’s what I use:
- Low-GI fruits like berries or cherries
- Unsweetened Greek yogurt or nut milk
- No-sugar protein powder
- Stevia or monk fruit for sweetness
- Chia seeds to add fiber and slow sugar absorption
Portion control is key. I make smaller pops and balance macros carefully. These have become a regular dessert option at family dinners.
Mistakes to Avoid When Making Protein Ice Pops
Common Blending Mistakes
When I first started making protein ice pops, I thought it was as easy as blending and freezing. I learned the hard way that a few small errors can make the difference between creamy and icy—or tasty and chalky.
Here are a few early mistakes I’ve made (and how to fix them):
- Over-packing the blender: This leads to uneven mixing. Always start with liquids first, then add solids and powders.
- Not blending long enough: Grainy texture usually means under-blending. Give it at least 30–45 seconds on high.
- Using too much powder: More isn’t always better. Too much protein powder can make your pops dense and dry.
- Skipping the straining step (if using fibrous fruits or chia seeds): A fine mesh strainer helps for smoother texture if needed.
Freezing Fails and Flavor Flops
Even the best mix can go sideways in the freezer. I’ve tossed out more than one rock-hard pop from experimenting. Here’s what to watch for:
- Not enough fat or fruit: Pure water and protein will freeze rock solid. Add yogurt, banana, or nut butter for softness.
- Wrong mold size: Too big, and they freeze unevenly or take forever to set. Medium-size molds (3–4 oz) work best.
- Filling molds to the brim: Always leave a little space—liquids expand when they freeze.
- Imbalanced flavors: Taste before freezing! Once it’s frozen, you can’t fix bland or overly sweet flavors.
Pro tip: If your pops come out icy or bland, try a small test batch next time before scaling up.
Frequently Asked Questions About Protein Ice Pops
1. Are protein pops healthy?
Yes, protein pops can be healthy—especially when made at home with clean ingredients like Greek yogurt, protein powder, and real fruit. They offer a balance of protein, healthy fats, and natural sweetness. Avoid store-bought versions with added sugars or artificial ingredients for the best health benefits.
Are protein ice creams healthy?
Protein ice creams can be healthy if they’re made with clean ingredients like Greek yogurt, protein powder, and minimal sugar. Store-bought versions may contain preservatives or sugar alcohols. Homemade versions give you full control over the macros and ingredients, making them a smarter dessert option.
How to make protein ice lollies?
To make protein ice lollies, blend Greek yogurt or nut milk with protein powder, fruit, and a natural sweetener. Pour into molds, insert sticks, and freeze for 4–6 hours. You can customize them to suit keto, vegan, or low-carb diets using simple swaps like plant protein and monk fruit.
Are ice pops healthy?
Most store-bought ice pops are high in sugar and artificial flavors, but homemade ice pops can be very healthy. Use ingredients like fruit, Greek yogurt, and natural sweeteners to create low-sugar, nutrient-rich snacks—especially when adding protein powder for a balanced boost.
Conclusion: Protein Ice Pops Are a Cool Way to Eat Smarter
Protein ice pops have been a total game-changer in my family’s kitchen. They’re more than just a frozen snack—they’re a smart way to stay on track with health goals, beat the heat, and satisfy cravings with real nutrition. Whether you’re refueling after a workout, managing blood sugar, or trying to get the kids excited about healthy snacks, there’s a version that fits your lifestyle.
What I love most is the versatility. You can build them vegan, low-carb, fruity, chocolatey, or rich and creamy. And with just a blender and a few molds, they’re incredibly easy to make at home. Honestly, once you try a homemade batch, you’ll never look at store-bought pops the same way.
This recipe is shared for informational purposes and is not a substitute for medical advice.
To stay connected and find even more fresh, healthy recipes, follow us on Facebook and Pinterest.